
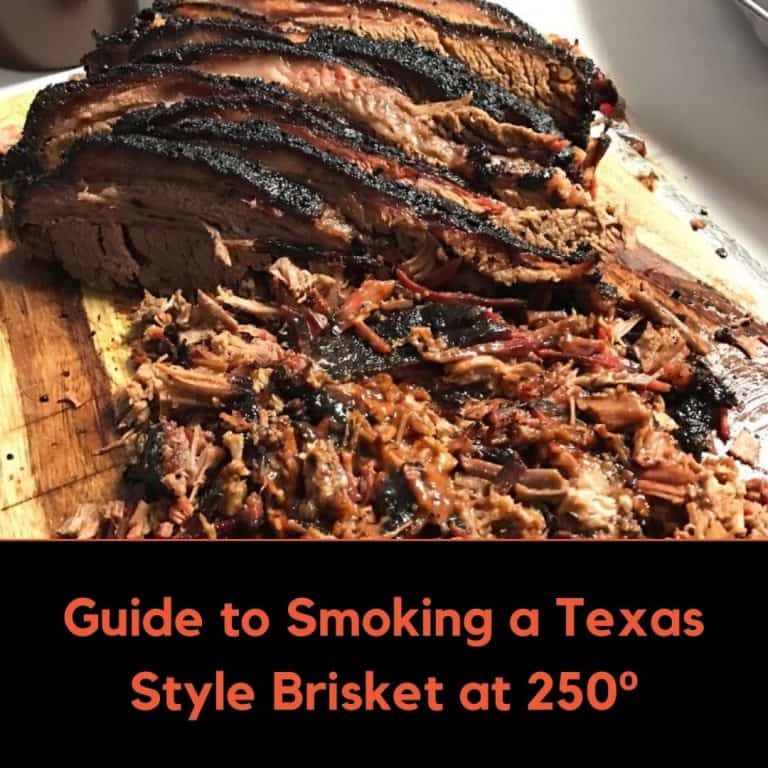
There is nothing better than a beef brisket smoked at a low temperature for a long time. The magic that happens as the fat cap dries then turns to a dark salty bark. Each bite is a perfect blend of fat, smoke, salt, pepper, and tender beef.
Developing this perfect bite takes time though and it needs real wood heat and smoke. No aluminum foil or oven will ever give you the result you are seeking. If you insist on using the oven method and aluminum foil then skip the brisket and get a top round or London broil.
No matter what cut you use it will still taste like a pot roast when covered and allowed to steam and braise in its liquids.

20% off first coffee subscription order with code COFFEECLUB20
Selecting a Brisket
Whenever possible look for a whole packer brisket that has not been trimmed down. You do not want a lot of fat on the brisket, you want about a ¼” thick fat cap. I have seen all too often briskets that are trimmed down completely.
When properly trimmed down and smoked, the thin fat cap will render down enough to become something magical. Shopping for a whole brisket outside of Texas can be tricky so check with your local butcher shop as these cuts are not as common in a grocery store.
Costco will frequently have prime beef brisket, but once again, that will not be everywhere.
I would suggest getting a 13-15 lb brisket. Look for one that does not have a fat cap that is significantly larger than the muscles. In my experience with briskets, I have found that anything over a 16-pound brisket does not mean more meat, just more excess fat.
Smaller briskets 13 lb and under will have higher ratios of meat to fat. Each one cooks differently though so keep this in mind when planning your cook. Trim it down, saving the fat and rendering it into oil. This will result in a roughly 12-pound brisket that is pit ready.
The rendered brisket fat is great used for making savory biscuits or tossed with some small marble potatoes when roasting.
Beef Grades
Yes, the grade makes a difference here. You want at the very least a choice-grade brisket. If you can get yourself a prime brisket or even an American Wagyu brisket then even better. The internal marbling makes these briskets extra tasty.
Take note that the more internal marbling the faster the brisket cooks. This is because heat transfers through fat faster than through lean muscle. It is both a good thing and a bad one. You do not want it to cook too fast. Too fast and the fat cap and pockets will not properly render down.
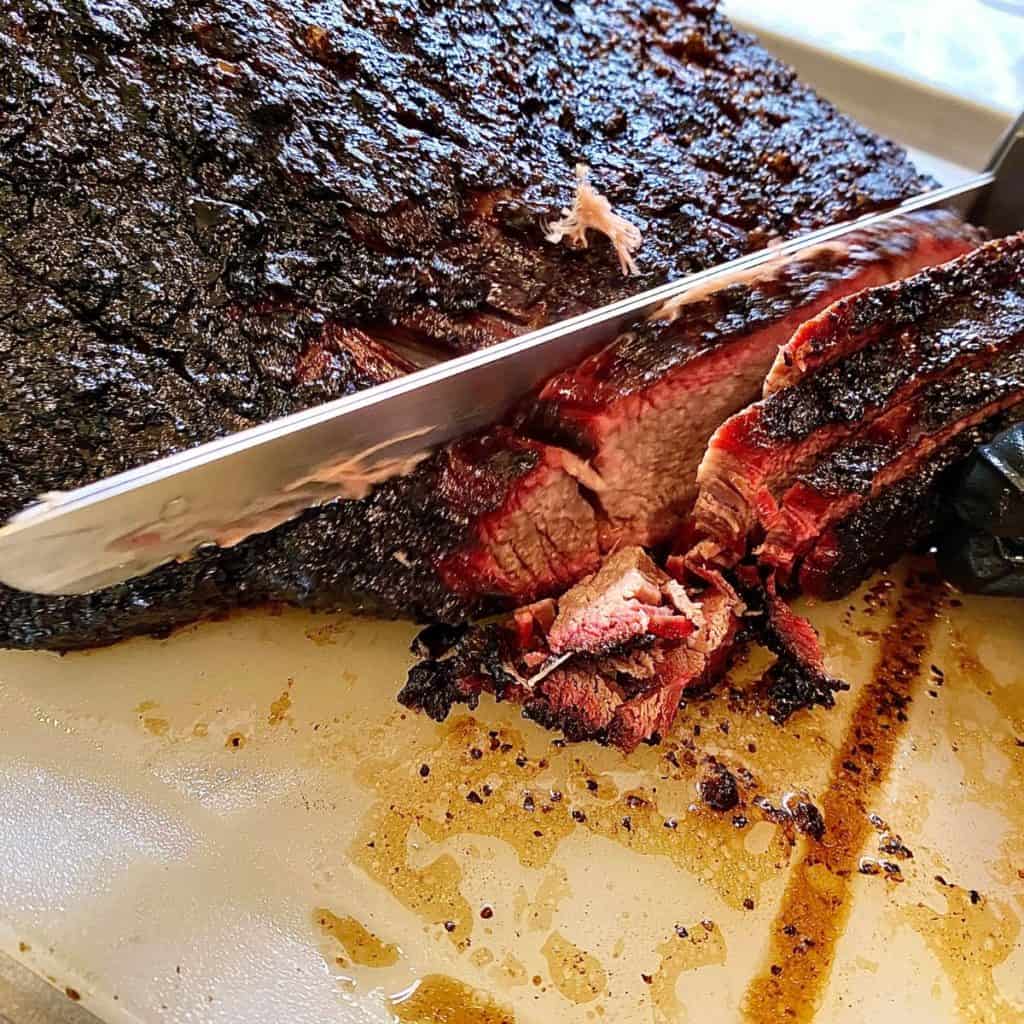
You will know you had a great cook and rendered the fat well when you slice into the brisket. When the fat cap is transparent you had the perfect cook. If it is still a milky white color then it did not have the time to properly render. It will still be a tasty piece of meat but the fat will not be as tasty and soft.
How Much Brisket Do I need?
A good rule of thumb in the bbq world is half a pound of meat per person. So how does that translate into a raw brisket? Depending on how much fat you trim off, expect to get roughly a 45-50% yield on a full packer brisket.
That means a 10-pound brisket will give you about 5 pounds of finished cooked brisket.
Time and Temperature
Cooking is a test of patience and skill. Whether you are scrambling an egg or smoking a brisket it is all about understanding the relationship between time and temperature.
The science of cooking can be boring at times but it is important to know so that you can make the right adjustments when the time comes. As every brisket is different, especially if you have a well marbled brisket, I do can not suggest a cooking time per lb of brisket.
Temperature Control
Controlling the temperature inside your smoker is crucial. You need to keep it at a steady temperature to get a consistent cook. When I say steady though that does not mean you will keep your temperature static throughout the cooking process. This is why I like to use wood pellet grills.
Maybe I’ve become lazy over the years but I’ve learned to appreciate the time I get back. I have spent many sleepless nights watching over a pit, slowly feeding it small pieces of wood.
There is something special about tending a pit during a long cook though. It is hard to put into words, it is an almost primal sense.
smoking at 225º VS. 250º
There are plenty of opinions on the ideal temperature to smoke a brisket. The only right answer is the one you decide works best for you. My perfect temperature is not either one of these although during my cook I will use both of these temperatures. Depending on the size of the brisket and the size of your pit will determine the right temperature.
Small pits keep the temp lower as the brisket will be closer to the firebox. Cooked at too high a temperature and the brisket will not have enough time to tenderize the connective tissue and render the fat and remain juicy. The general rule of thumb for the best brisket is to cook it low and slow.
Slow cooking gives you the benefits of tenderizing and rendering fat while maintaining the juicy flavor that makes smoking brisket so damn special.
I will start my brisket at the higher temperature of 250º and run it at this temperature for a few hours. Just before the brisket begins to hit its stall I will get the temperature up to 275º.
This will help the fat render as well as push the brisket through the stall a little faster. From this point on I slowly let the temperature drop until it hits 225º. I will keep it at the lower temperature of 225º for the remainder of the smoke. This technique came from Aaron Franklin and it has consistently resulted in fantastic results.
Should I use a Water Pan?
I’m personally not a fan of using a water pan for smoking meat. The only exception is for some vertical smokers. The brisket has plenty of moisture so the extra hot water in the pit will only slow down the cooking process and extend the stall.
Brisket Seasoning
Kosher Salt and Course Ground Black Pepper is the only dry rub you need. You will sometimes find the black pepper called Butcher Grind. Season first with salt and then with pepper. I do not like to mix the two as you will lose control over how much of each one you are putting onto the brisket. It takes more seasoning than you think, do not go light.
About 2 tablespoons of both salt and pepper per side. If you wish you can also use a binder to help the seasoning adhere to the meat. If you do you can cut back a little on the seasoning. Binders are ingredients like yellow mustard or Worcestershire.
You do not need much of either one, just enough to create a sticky surface on the brisket. I do not use a store-bought dry rub for this. Many contain sugars and other spices that I prefer not to have on my brisket. Once again, this is just my personal style. Find your style and experiment with various dry rubs or even inject the brisket with beef bouillon.
Which Side is Up?
Many people will tell you to cook your brisket fat side down and they all have their own reasons. My personal preference is to cook with the fat side up. One, I can see how the fat is rendering and in my pits, the fat cap renders better resulting in a better bark.
Chances are if they are telling you to cook your brisket fat cap down, they also tolled you to wrap your brisket in foil when you get to the stall.
The Stall
During the cook, the brisket will slowly begin to sweat. This is called evaporative cooling and is the same concept as when we sweat, it is designed to cool us down.
As the internal temperature slowly begins to climb it will push more and more moisture to the surface. At a certain temperature, the surface moisture will get to a point that it will prevent the brisket from cooking any further. It can cause the internal temperature to drop a little while you are waiting for the moisture to finish evaporating.
Once the moisture is gone the brisket will begin to cook again and the internal temperature will start to climb once again. The stall is the ultimate test of patience, especially on your first smoked brisket. In all, the stall can last several hours and can be a large part of your total cook time if the smoker’s temperature is not adjusted.
You will hear and read about people telling you to wrap your brisket during this time to help it push through the stall. Bad idea! That will cause it to steam and all the work you have been putting into creating the perfect bark will be gone and the meat will end up tasting like pot roast, not smoked brisket.
Wrapping your brisket
I prefer to not wrap my briskets. If you do, you want to get what is called pink butcher paper. This allows the brisket to slowly release moisture and not steam. I will never use aluminum foil. Even though it is called the Texas crutch method it is a very old-world mentality and is not used in true Texas bbq smokehouses.
I will however wrap my brisket when I pull it off the pit to rest. This is for no other reason than food safety. A wrapped brisket will keep flys and pests off the meat itself while it is resting.
Smoked Brisket Internal Temperatures
Here are some notes of the internal temperature of the meat to remember.
The Stall begins in a temperature range between 155º to 165º and can last up to 6 hours.
The final Internal Temperature of the brisket should be around 203º. I like to pull my brisket out a little before this and wrap it as the carry over will finish cooking the brisket. I also use will pick the brisket up in the middle with both hands. If it wants to sag over my fingers then it is ready.
If it stays rigid and does not want to bend then it needs more time. The perfect brisket is not a temperature as much as it is the feel. Every brisket will cook differently so it is important to learn to feel for doneness. Just like you would a steak.
A finished brisket should be soft and when lightly dropped should jiggle for a moment. Believe me, it is a beautiful sight to see.
How long to rest a cooked brisket
This is one of the most crucial times of the cooking process. Just because the brisket is off the pit does not mean you get to relax. You need to wait at least an hour before you cut into your brisket. If it is under 50 degrees outside then rest the brisket at room temperature in your house.
You want to give the brisket enough time to slowly, and naturally, begin to cool down. Slicing into it too early will cause all the juicy brisket to dry out and you will lose both flavor and tenderness.
If the brisket is done too early and you need to keep the brisket warm for longer than an hour then finish resting the brisket in an insulated cooler or even your oven. Keep both of them cracked open though so any steam can escape.
I ruined a few briskets once by putting them into a cooler too soon. When I opened the cooler this huge cloud of steam came out. They had overcooked by steaming and were dry and flavorless. I was so upset with myself as I knew better.
Slicing the Brisket
A whole brisket is two muscles on top of each other. The bottom muscle is leaner while the smaller top muscle is heavily marbled. The size of the cut for each muscle will be different as well.
Start from the flat, the lean, slicing into thin ⅛” thick slices working towards the point. You want these to be slightly thinner slices as the flat is not as marbled and can taste dry if cut too thick.
In Kansas City, they will slice this part of the brisket on a deli slicer. To me, that is too thin but I understand why. Remember to slice against the grain of the meat. Otherwise, you will have chewy meat no matter how tender it was when you cooked it.
When you get to a point where you can see the second muscle, stop slicing. Cut the top muscle off by slowly slicing through the middle fat webbing. Then scrape off any of this fat and continue to slice the flat that now has no fat cap. This part is called extra lean.
You will slice the point in the complete opposite direction as the flat, this is why it is important to separate the two muscles. The point, called marbled brisket, should be cut thicker as well.
The thickness of a pen or pencil is about what you are looking for. This is the best part of the brisket as it has that beautiful blend of seasoned bark and rich meaty flavor. Leftover brisket is best chopped down and warmed with some barbecue sauce and used for sandwiches or loaded baked potatoes.
Burnt Ends
True burnt ends are the extra fatty pieces on the side of the point. It is the first cut and should be cut about 1” thick then cut again into 1” cubes. This is for the pit team to enjoy, if they decide to share it with you be appreciative as there are only about 4 bites from one brisket.
In Kansas City, burnt ends have become so popular that the point and flat are diced into 1” cubes and then tossed in a sweet barbecue sauce and put back onto the pit for a second cook. I am not a fan of this for a few reasons. The first is that the lean will never be part of a burnt end.
It will be tough when diced that large. Second, great Texas brisket will not need sauce. Especially the intensely sweet barbecue sauces from Kansas City and Memphis.
Comments are closed.